- Active RADAR Missile - A missile that contains an active RADAR set and other necessary avionics that allow the missile to fly independent of the launching platform's RADAR.
- SARH (Semi-Active RADAR Homming) Missile - Requires the launch platform to maintain a RADAR lock on the target. The returning RADAR waves are intercepted by the missile for guidance. If the launch platform breaks RADAR lock with the target, then the missiles will lose guidance and fly wild.
- F-Pole - F-Pole is a term associated with SARH missiles. It is the distance from the launching aircraft to the target at missile impact or better known as the missile stand-off distance. Soviet designed SARH missiles (mainly the R-27) are generally faster than American SARH missiles. When two fighters are approaching each other, the aircraft having the missile with the longest F-Pole usually wins. The F-Pole of a missile provides a relative performance measure between two forward-quarter missile shots. The purpose is to knock out the shooter's RADAR before his missile hits you. But it is still dependent on the launching platforms speed at launch. The missile will also have the speed of the launching platform to add to it's potential energy. The rocket motor doesn't burn for the entire flight of the missile, so any boost in the speed of the missile will aid it in hitting the intended target. You must also maintain an acceptable ASE (allowable steering error) so the missile does not loose lock. The truth is, the actual F-Pole of a given missile launch situation is classified.
- A-Pole - A-Pole is the distance from the launching aircraft to the target when the missile begins active terminal guidance. The AIM-120 flies to a predetermined point in space using the INS and then activates it's onboard RADAR. This is approximately 10nm for the AIM-120 AMRAAM. The AIM-54 Phoenix missile contains active RADAR avionics but uses SARH mode to get to the target before switching to active. The A-Pole of the AIM-120 is classified.
- E-Pole - The range from a threat aircraft that a drag must be accomplished to kinematically defeat any missile the bandit could have launched or is launching. This is also known as the no escape zone and is different for all missiles. The E-pole of a missile states that if a given missile flies to say 10 nm that it will hit it's target even if the target pulls up to an 8g maneuver at 500kts. But if the range is increased to 15 nm, then the missile may only be able to hit a target doing 5g's or less. If you look at this, you will see that the E-Pole includes the fact that the longer a missiles flies, the less the strike ability due to loss of kinetic energy. As stated before, a missile runs out of gas before it gets to it's intended target. So the ability to pull high g's by the missile diminishes as the missiles range increases. Remember from the BFM / ACM module that the missile will pull max lead as it flies to ensure a lead collision flight path. Again, the E-Pole of a given missile is classified.
This module will discuss the air-to-air weapons used in the F/A-18 Super Hornet simulation. Please note that the information I have provided is not perfect by any means as many of the weapons parameters and their uses are classified. Especially the Soviet designed missiles. I have tried to provide as much information as I could get my hands on without being to in depth.

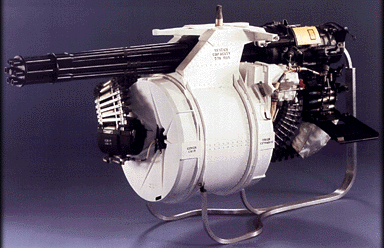
M61A1 Vulcan Gatling Cannon
Type: Gatling
Cannon
Range: Up to 1nm
Ordnance: 20mm shells
Weight: 255lbs
Mount: Internally
Muzzle Velocity: 3,400 feet/second
Fire Rate: 6,000 rounds/second
Max. Rounds: 515
The gun has been a weapon of controversy since the invent of the air-to-air missile. When taken out of the fight in the first designed Century series of fighters in the 50/60's, the impact was felt by the pilot's who wished they had it in Vietnam who were faced with the nimbler fighters which did carry the gun. Because these pilot's where unable to use the full capability of the Sparrow missile, knife fights were usually the call of the day to the American pilots dismay. When placed back into the fighters (the F-8 Crusaders of the day were having excellent results against enemy fighters) and the training to use them implemented, the results were outstanding. The gun lethality in this simulation is probably close to the actual lethality of the weapon. There are other factors involved such as shell TOF (time of flight), trajectory path, gravity, aircraft g-load, parasitic and aerodynamic drag that affect the flight of the shells, but that is beyond the scope of this training. I suggest Robert L. Shaw's "Fighter Combat: Tactics and Maneuvering" if you require more information.
![]()
AIM-9M Sidewinder
Guidance: All aspect infra-red
Length: 9ft 7in
Diameter: 5in
Span: 2ft 1in
Weight: 198lbs
Warhead: 22lb annular blast fragmentation
Performance: speed - Mach 2+
range - 11nm (nautical miles)
The AIM (air intercept missile) 9 series of air-to-air missiles have been around for quite some time. In Vietnam, the AIM-4 was used as well as the AIM-9. Both used IR (infra-red) based seeker heads. IR seeker heads use the infra-red energy light frequency to detect "heat" sources based on the different colors presented by the hot spot. Mainly the hot exhaust gases that are expelled from the other aircraft's engine. The seeker is mounted on a gimbal to allow the missile the ability to follow the target even though the missile is not perfectly lined up with the target. The seeker head works in two different modes. One mode "slaves" the seeker head to the RADAR movement. This is called "gimballed" to the RADAR. When the RADAR has acquired a target, the seeker is pointed in the general proximity of the target to get a lock. When the missile acquires the target, a growling noise is heard in the pilots helmet comm gear. The other is of course "ungimballed" or "unslaved". This is where the seeker head is allowed to move on it's own to acquire a target. The real missile is not perfect though. It is susceptible to all heat sources, including the sun! This missile should always be selected as the current weapon while in flight.
![]()
AIM-120A AMRAAM
Guidance: Active RADAR
Length: 11ft 9in
Diameter: 7in
Span: 3ft 4in
Weight: 335lbs
Warhead: 40lb high explosive
Performance: speed - Mach 4+
range - 25nm
The AIM-120 was designed to replace the aging and woefully inadequate AIM-7 Sparrow series of missiles. The main difference between the AMRAAM, nick-named the "slammer" by pilots, and the Sparrow is that AMRAAM has an "active" RADAR seeker instead of a "semi-active" seeker (referred to as SARH or semi-active radar homming missile). Some people have inaccurately refered to this missile as "fire and forget". The truth is the missile still requires a radio guidance signal from the launching fighter to guide the missile after launch. The AMRAAM contain an Inertial Navigation System that handles the navigation to the last known coordinates of the target. The radio signal provides course deviation and correction information. Within 10nm of the target, the missile goes "active" with the onboard RADAR unit and continues to track the target on it's own. In the simulation though, the missile can be fired and track the target without maintaining a RADAR lock on the target. This missile was designed for BVR (beyond visual engagement) fights.
<NO PICTURE AVAILABLE>
GSH-301 30 mm Cannon
Type: Smooth bore
Cannon
Range: Up to 1nm
Ordnance: 30mm shells
Weight: 110lbs
Mount: Internally
Muzzle Velocity: 2,000 feet/second
Fire Rate: 1,800 rounds/second
Max. Rounds: 150
A very accurate and deadly weapon, the GSH-301 has been around for many years as the mainstay air-to-air weapon in the Soviet arsenal. The aircraft generally carries 150 rounds of ammunition which can rip an aircraft to shreds within seconds. The point is, don't get close enough to find out if you can...
![]()
Advanced ATOLL A-2-2
Guidance: Rear-aspect IR
Length: 9ft 2in
Diameter: 4.7in
Span: 1ft 9in
Weight: 154lbs
Warhead: 13lb impact delay-fused blast fragmentation
Performance: speed - Mach 2+
range - 5nm
This is an aging Russian version of the Sidewinder. It is carried by the MIG-21 Fishbed due to the limited avionics. It is extremely less capable than the new generation of the AIM-9 as noted by its range, but never the less can make you wish it weren't on it's way to your jet...
![]()
APEX AA-7A/B (R-23)
Guidance: Rear-aspect IR (B) or SARH (A)
Length: 15ft 1in
Diameter: 8.8in
Span: 3ft 5in
Weight: 705lbs
Warhead: 88lb proximity and impact fused blast
fragmentation
Performance: speed - Mach 3+
range - 10nm (B) & 34nm (A)
Russian weapons designers were very resourceful in their creation of the newer air-to-air weapons. In the case of the Apex (and other missiles below), the missiles are designed with either an IR based seeker or a SARH seeker. This missile is equivalent to the Sparrow family of missiles in performance (SARH role) except it carries an extremely large warhead. This one is usually carried by the MIG-23 and older fighters but will get you just the same...
![]()
APHID AA-8A/B (R-60)
Guidance: All aspect IR (A) or SARH (B)
Length: 7ft (A)
7ft
8in (B)
Diameter: 4.7in
Span: 1ft 3in
Weight: 121lbs (A)
132lbs (B)
Warhead: 18 lb Proximity and impact fused blast
fragmentation
Performance: speed - Mach 3+
range - 6nm (A) & 9nm (B)
This is another copy of the Sidewinder missile (in mission only) and is designed around the close in dogfight. It is an older missile, but exceptionally more capable than the ATOLL family of missiles. It is mostly used in the IR version of the missile but can be carried by almost all Soviet built aircraft including helicopters.
![]()
ALAMO AA-10A/B (R-27)
Guidance: Rear-aspect IR (B) or SARH (A)
Length: 10ft 6in (B)
13ft
1in (A)
Diameter: 4.7in
Span: 1ft 9in
Weight: 342lbs (B)
440lbs (A)
Warhead: 45 lb Blast fragmentation
Performance: speed - Mach 3+
range - 12nm (B) & 24nm (A)
This is one of the most capable and versatile missiles ever created by the Vympel weapons designers (a company in Russia) of the Commonwealth of Independent States (CIS, formally known as the USSR). This missile has many variants with all being extremely lethal. It was designed to replace the aging R-23 series of missiles for the newer generation fighters like the MIG-29 Fulcrum and SU-27 Flanker. It is generally used in the SARH role for the extended range and BVR kill.
Terms & Tactics & Strategy
WEAPONS
The air-to-air missiles in this simulation have not been represented
with great realism. Instead, they have been designed around playability.
The lethality of the M61A1 cannon shells however are pretty close. None the
less, you will need to master the use of each of your weapons systems to
ensure your survivability. Each of your air-to-air weapons have certain
performance characteristics, limitations, and deployment requirements.
GUNS
Your M61A1 Vulcan cannon should become your "bread and butter"
tool of choice. Your gun is capable of destroying small to medium-sized aircraft
with ease, and large bombers or transports with longer bursts. Its maximum
range is about a mile, so don't waste your ammunition. Although your gun
sight is quite accurate, watch your tracers to help correct your aim.
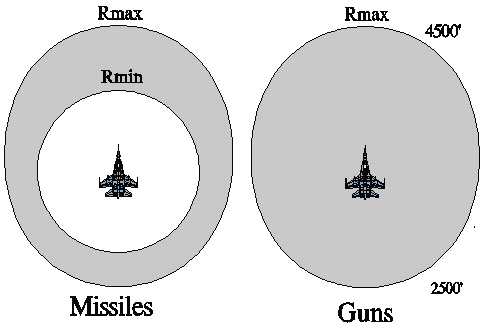
The majority of the tactics covering maneuvering for the guns shot is covered in the BFM / ACM module. This is because the gun is a fixed forward firing weapon and requires being able to maneuver the aircraft to get the shot. But to recap, the gun has an Rmax of approximately 4500ft in the front-quarter area and 2500ft in the rear due to g's, velocity of the bandit, etc. There is no Rmin for the gun, but if you get to close to the bandit, you may be eating aircraft parts or even worse, cause a collision.
There are also two kinds of shots, the Snap-Shot and the Tracking shot. Snap-shot refers to an instantaneous shot that is taken while flying from an unstable position near the bandit. This usually takes place from the front-quarter to approximately 90° (beam quarter) of the bandit's aircraft. Snap-shots are harder to make, but present themselves more frequently than the tracking guns shot. Snap-shots usually need an increased level of lead to allow the shells to reach the area before the bandit's aircraft arrives at the same area (or known as 1 TOF (time of flight) before).

AIM-9M
The AIM-9M shot is much like the guns shot and AIM-120 shot
put together. Because the AIM-9M (also known as the "9mike", "winder", or
"heater") is launched at such a short range, ensuring high speed IS NOT what
you want to do here. You want to be at corner velocity to ensure the ability
to lay some BFM on the bandit if he evades. Maneuvering is still as per the
BFM / ACM module. You will notice that there are two tones that you will
hear with the 9mike. The first is the tone given at lock from Rmax.
This is a low pitched growl. But as the bandit comes closer, the pitch changes.
This is because the bandit has entered the missiles lethal zone. One thing
you also do not want to do is ripple fire missiles. Make sure you put a few
seconds between your shots. This will ensure that the missiles aren't defeated
by the same flare. Drain him dry! Kill his energy so that he can not out
maneuver either the next missile or you!
Sidewinders and AMRAAMs are both fire-and-forget missiles, but they differ in performance and susceptibility to countermeasures. Sidewinders, which are heat-seekers, seem to have a higher Pk (although this may be due to the range from which they are fired). Firing from shorter ranges will give enemy pilots less time to react and evade your missiles. While AMRAAM performance may be somewhat disappointing compared to real world reports, the Sidewinder is close.
AIM-120
As the information above states, AMRAAMs are active-radar guided
missiles with a "workable" range of about 30 nm in the simulation. You might
hit a target as far away as 40 miles in the real world, but don't hold your
breath. Janes deliberately "downgraded" the effectiveness of AMRAAMs so that
short range dogfights would become more common. It's a wonder AIM-120s were
even included. The AMRAAM did not see action in Desert Storm, because it had not entered military service prior to our deployment
in the Gulf.
The AIM-120 has by now replaced the aging AIM-7 Sparrow missile.
While the Sparrow had a "theoretical" range almost the same as that of the AMRAAM,
it was a semi-active radar guided missile. This means that the attacking
aircraft could only fire on one target at a time, and had to fly directly
at its target for the duration of the flight of the missile (to continue
illuminating the target). The AIM-120 on the other hand, is a fire and forget
weapon, which makes it much more versatile. Thus after initial update of guidance
the attacking fighter can turnaway or engage another target.
The first thing in the fight is to get into position to get the shot off. With the F/A-18 RADAR acquiring the Bandit, BVR kills and tactics are almost impossible for him to counter. You can definately get the kill with an AIM-120.

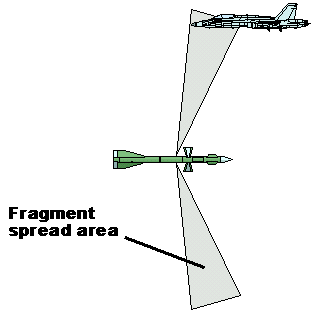
The goal of the AIM-120 launch is to ensure you have a good speed advantage when launching. This will ensure the launching platforms speed is imparted to the missile. This will increase your E-Pole advantage and allow the missile to active sooner. After the shot, TURN AWAY! The closer you get to the bogey, the harder it will be to defeat his missile shot! Because the missiles use a blast-fragmentation warhead, the missile does not have to actually hit the bandit to do damage. You want to maintain enough turning area to defeat any missile shot made by the bogey. If your shot is defeated, turn for another shot. The bandit will be recovering from the last shot giving you time to set up for the next shot. In a 1v2 engagement (where you are the one, and only one..argh), it is usually best to fire 1 shot at each bandit and then concentrate on one while they both are trying to evade. Get at least one kill quickly! This will allow you set up for BFM on the other bandit.
This is a large subject. I am presently working on upgrading the information of ensure you get best out of the weapons in Hornet. For additional Information please see Chapter 7 of the VNT-1 Ground School.