4.10. Air Combat Maneuvers (ACM)
ACM normally involves coordinated maneuvering between two fighters employing BFM to kill, defend or separate from one or more bandits in a visual merge. The engaged phase can be the outcome of the intercept phase or an undetected bandit entry, and is the highest risk phase of an air-to-airengagement. Distinct roles, or an "ACM Contract," must be briefed and established between the twofighters prior to any flight with the potential for ACBT in order to a ssure effective ACM. This contract defines "engaged" and "supporting" roles. Disciplined execution of these roles is critical for survivability and lethality. Any break down in the established "ACM Contract" can lead to undesirable and disastrous outcomes! (i.e. Midair).
4.10.1. ACM Objectives
· Develop proficiency in two-ship coordinated maneuvering.
· Teach specific engaged and supporting fighter roles in a visual fight.
· Develop enhanced situation awareness.
An F-16 is capable of rapid kills from an offensive start. Consequently, the role of the supporting fighter is not the same when his element mate is offensive as when the other F -16 is defensive. This adjustment in priorities resulting from the other F-16's positional advantage/disadvantage requires focused, concentrated training in the visual environment. There are four cornerstones to effective elementemployment: communications, formation integrity, flight discipline, and weapons employment.
4.10.2. Communications
Calm, clear, and concise communications are vital for effective element employment. Each pilot mustfirmly understand MCM 3-1, Vol I brevity terms, unit standard terminology, and be able to use the correctterms at the correct moment in a fight. If the situation cannot be addressed using MCM 3-1 brevity orunit standard phrasing, use clear text to accurately describe your intentions or maneuvers. Proficiency inone’s communications skill is gained only by daily practice and constant critique. The time to startimproving your comm is not after the first "Break right" call. The planned c adence, comm procedures,and brevity terms that are expect to be used during the flight should be reviewed in the flight briefing toenhance their effectiveness. Shortening communications too much is a bad habit that fighter pilots needto avoid. Nonstandard radio terminology (i.e. lack of proper call sign), and excessive verbiage can causeconfusion and misinterpretation at a critical time. This could result be fatal. Use full call signs whenbeginning radio transmissions to gain the attention of flight members requiring the information you haveand allowing noninvolved flights to "tune out" your transmission. All missions (not just air-to-air) shouldfocus on communications discipline!
As part of a fighting team, you will see situations develop quickly as you maneuver. As the banditmaneuvers you will have to communicate what you see in the most efficient way. As the wingman, youmay have to tell lead what to do if you have tally and he doesn't. If your information isn't critical, yourradio call should be descriptive and lead will use it to make decisions while maintaining control of theflight. When the flight is definitely threatened, a directive transmission is called for.
4.10.2.1. Directive Transmissions
A directive call is required when a threat warrants an immediate reaction for survival. Directive radiotransmissions must be prefaced by the call sign of the aircraft being addressed, i.e., "Viper One, breakright!" After making the directive transmission "Viper One, break right," pause, look and see if lead isdoing what was directed. If not, re-transmit the directive call. The priorities need to be placed on theexecution of the directed action. All other mission tasks are secondary until the threat has been negated ordefeated. The supporting fighter may be required to make a series of directive calls due to limited time.
"Viper One, break right," "Viper One, jink now," "Viper One extend," if the supporting fighter has thetally and there is not time to describe the bandit's position without jeopardizing the safety of Viper One.
4.10.2.2. Descriptive Transmission
Descriptive transmission are normally prefaced by the call sign of the aircraft doing the talking, (i.e."Viper One, tally bandit, left 10, 5 miles, level.") When a directive action is r equired the descriptivecomm must come after the directive transmission and action is taken. Then, describe why you made thedirective call. The bandit descriptive call is important for it will allow Viper One, in this example, toacquire the tally and perform the proper BFM to defend himself. The bandit call has been standardizedinto the following format, which should always be used:
· Call Sign.
· Type aircraft, or threat (Bandit /Bogey).
· Left or Right (side of aircraft.)
· Clock position.
· Range.
· High/ Low/ Level.
· Amplifying remarks.
Here’s an example of the above format: "Viper Two, bandit, right 2, 3 miles, high." A modificationof this format is used to follow up a directive call if your element mate is under attack. Here’s anexample: "Viper One, break, right," pause, as the directive action being taken, then continue with thedescriptive comm: "Bandit, right, 5, 9,000’, level." In this case, the position of the bandit is describedwith reference to the aircraft under attack. Continue descriptive comm until the engaged fighter is tally.Sometimes subsequent descriptive calls may include the word "continue." This informs all flightmembers that the only reaction required is the maneuver that is being performed. For example Viper Onecalls, "Viper flight, hook right," "Viper One, bandit, right 4, 5 miles, slightly high, continue right."
4.10.3. Formation Integrity
Formation integrity is an integral part of all element maneuvering. In the ACM environment,formation integrity allows both the engaged and supporting fighters to maneuver synergistically to defeatthe bandit‘s attack. Mutual support and formation integrity are critical to success. The engaged fightermust do his best one versus one BFM to kill or survive the bandit’s attack, while the supporting fightermaneuvers to kill the bandit or support the engaged fighter based on the criteria defined by the flight lead.
4.10.4. Flight Discipline
Flight discipline is an important factor effecting the success of fighter employment. This requiresadherence to clearly defined responsibilities and decisions based on the flight lead’s overall game plan andphilosophy of employment. The flight contract is fulfilled by executing your duties based on the flight
lead’s plan (i.e. set of assumptions and guidelines). The flight lead can assess the success of the plan orfailure and make changes to the plan. Obviously, no pilot should do anything to place himself or hiswingman in a defensive situation. However, changing or ignoring the flight lead’s directions based onpersonnel preference is unacceptable!
4.10.5. Weapons Employment
Knowledge of your weapon system capabilities and limitation will allow you to make accuratedecisions concerning weapons employment. You must apply your BFM skills to maneuver to a WeaponsEmployment Zone (WEZ) then effectively put weapons on target to kill. The status of your element mateand yourself will be affect your decision to maneuver immediately to a WEZ, defend, or reposition.
4.10.6. Engaged and Supporting Fighter Contract
Most units have "standards" that provide essential, clear, and unique procedures to: ensure success intraining and combat sorties, minimize briefing time, clarify ambiguities, and establish a common point ofreference. These "standards" need to be fully understood by every pilot in that unit. An effective "ACMContract" assigns responsibilities between two aircraft that are essential to take full advantage of theelement's capabilities during an air-to-air engagement. In the flight briefing it’s the flight lead’sresponsibility to ensure complete understanding of the "ACM Contract." The division of responsibilitiesserves two basic purposes: killing the bandit and ensuring element survival. The ingredients required forsuccessful execution of the "Contract" is mutual understanding of the game plan and a correct balance ofcommunication, mutual support, executions of responsibilities, and weapons employment.
4.10.6.1. Engaged Fighter
During offensive maneuvering there can only be ONE actively engaged fighter (fighter that ismaneuvering in specific relationship to the bandit) at a time. While defensive, the bandit will choose whois the engaged fighter. In a dynamic environment, such as air-to-air, the roles may change rapidly fromone to the other several times. Flight members MUST fully understand their responsibilities and howthey will be handed off, (whether by radio calls or aircraft maneuvers).
Engaged Fighter Responsibilities:
· Maneuver to kill the bandit (offensively) or negate the bandit’s attack (defensively) in the minimumtime. Fly your best offensive/defensive BFM.· Clear the supporting fighter to engage if he is in a better position to shoot, or if defensive and theengaged fighter is not safely outside the supporting fighter’s weapons FOV or target debris would befactor, again clear the supporting fighter to shoot.· Keep the supporting fighter informed of intentions, capabilities, and future tactical plans.
4.10.6.2. Supporting Fighter
As the supporting fighter you may have to perform two or more tasks/ responsibil ities at the sametime. Time sharing between the tasks at hand is required to effectively support the engaged fighter. Thetime allowed to perform a given set of tasks will be scenario dependent. As a rule of thumb (ROT) thesupporting fighter needs to first maneuver to sanitize the area about the fight through visual (tally/visual)and electronic means (radar, GCI, RWR). Next be prepared to commit against any bandit that threatensthe element, whether offensively or defensively. Lastly, maintain a high situational awareness to directthe egress in a safe direction.
Supporting Fighter Responsibilities:
· Maintain visual and strive for tally.
· Inform engaged fighter of posit (potential for mid-air in the ACM environment makes this extra comm important)
· Sanitize the area about the fight through visual and electronic means (check your own six).
· Maneuver to avoid the fight and gain or maintain entry parameters on the bandit.
· Employ ordnance if the bandit is in a WEZ, consistent with the flight leads game plan, and without compromising the engaged fighter’s safety.
· Engage other bandits that are a factor to the element and keep the engaged fighter informed.
· Maintain overall situational awareness to include area orientation, fuel, and exit avenues.
· Direct the egress.
4.10.7. The Flight Lead/Wingman Relationship
The previous discussion does not equate engaged and suppor ting roles with leader and wingmanpositions; this is intentional. Our tactics are designed to allow the best positioned fighter to engage thebandit offensively. While on defense, the driving factor for whom is engaged will obviously belong to thebandit. This should not imply break down within the basic flight lead/wingman responsibil ities. Theflight lead still has the ultimate responsibility for mission accomplishment and flight survival. The flight lead also makes the decisions about whether or not to engage, what tactics will be used, and who will do the engaging or separating. While the wingman is engaged, the flight lead supports him but retains the authority to direct the engagement, to terminate the engagement, to assume the engaged role, or to revert his wingman to the supporting role.
The engaged/supporting responsibilities work effectively in most 2 v 1 situations; however, when thecontract breaks down, the flight may present a danger to itself. Confusion of roles is the most commonproblem. Two fighters, each thinking they are engaged, can easily end up occupying the same airspace.For this reason, flight and element leads will brief engaged and supporting responsibilities, maneuveringdeconfliction, role changes and desired engaged communications prior to any flight with the potential forACBT maneuvering. Element or wingman deconfliction subsequent to a blind call or planned loss ofsight tactic will be briefed for any planned intercept or ACBT flight where more than one element or more than one fighter may be maneuvering against the same bandit or bandits. Elements/wingman will not begin visual offensive maneuvering against an adversary unless cleared to engage by the flight/element lead. Formal squadron/wing standards covering this requirement are adequate if all flight members are fully aware of the standards.
4.10.8. 2 V 1 Offensive Visual Maneuvering
The visual phase of maneuvering is really the "meat of the mission" where ACM is concerned. Thetactical intercept gets the element to the merge, usually in an offensive position. Once there, our twoairplanes must work together in accomplishing the primary goal which is to d estroy the enemy ASAP,while maintaining mutual support. There must be complete understanding between the leader andwingman of their obligations towards one another. This understanding forms the basis of the contractwhich governs two-ship visual maneuvering.The termination of the intercept phase is when the element arrives in pos ition to begin visual maneuvering against the bandit. It is imperative that the element establish roles ASAP. The flight lead should transmit his intentions (i.e. "Viper 1, engaged, nose 3 miles.") This not only anchors the fight but establishes the engaged and supporting roles. If the bandit detects your attack and maneuvers to counter it, the tactical wingman may be in a better position to engage. If so the flight lead should direct the wingman to engage, (i.e. "Viper 2, cleared to engage bandit nose 3 miles, press.") The engaged fighter needs to perform his best one versus one BFM, place the bandit in a WEZ as quickly as possible, and employ ordnance to kill the bandit. If the bandit negates your attack, continue to perform BFM forcing the bandit to react defensively and remain predictable. If you lose the offensive (i.e. neutral), due to bandit reaction, communicate this to the supporting fighter ASAP.
The supporting fighter needs to pick-up the supporting role, perform supporting fighterresponsibilities, and setup the support structure. To set up the support structure the supporting fighter needs to off-set himself from the fight both horizontally and vertically. Fly BFM through the bandit’s TC while lagging the engaged fighter. Then extend past the fight. Ensure the afterburner has been selected to maintain 450 knots or greater and extend through the fight arena quickly build needed separation. No matter which plane you merge with the fight, stay there and continue to split plane in that direction, to visual constraints (i.e. if already high above the fight, stay there and not on or near the horizon). Maintain sight of the fight by placing it at your 7 - 9 o’clock or 5 - 3 o’clock whichever way is easiest to maintain sight with the fight once to the outside of the fight. Roll out wings level and extend for about 5 - 10 seconds and then check back into the fight with 4 - 6 G's. Be sure not to arc in a climbing turn since this will not allow you to gain the desired separation from the fight and will highlight you to the bandit. Fly straight lines and check turns to achieve your goal range of 2 to 3 miles with at least a 4000 foot altitude split between you and the fight. This range and altitude split from the fight will allow the supporting fighter time to radar and visually sanitize, and preserve maneuvering room for a shot of opportunity or a role change. Additionally, this position will make it hard for the bandit to acquire the supporting fighter and threaten him. Bandit maneuvering, visual acquisition, and environmental conditions must be taken into consideration.
Never place yourself in a position where you could become defensively engaged with the bandit that your flight member is engaged with (i.e. allow the bandit to point at you aft of your 3/9 line). That will not support killing the bandit and may get you killed. To avoid this put yourself in a position that will make it hard for the bandit to acquire you (split plane). Continue to maneuver away from the fight and sanitize the area for as long as the bandit's turn rate will allow. Visually confirm that the area around the fight is free from other bandits. A good technique is to first focus on an object at range (such as a mountain, or cloud). From there do a sector scan looking not for a specific aircraft, but movement. Force yourself to search not only along the horizon but high 12 and deep 6 o'clock as well. The radar should be in ACM with Slewable selected and biased to the outside of the fight or 20-mile scope minimum, with the el-strobe biased in the direction of the expected threat. After that volume of airspace has been sanitized, you are going to have to change the el-strobe to sanitize the remainder of the ai rspace. Listen closely to GCI for threat calls and sanitize that avenue of approach accordingly. Do not lose sight of the fight in the process. Time share between the suppor ting tasks is a must. As the bandit's extended 3 - 9 line approaches your jet (beam plan form), start a turn back into the fight to place it at left 10 or right 2-O’Clock, whichever way is easier to maintain sight. A bandit that is aware and maintains the tally on both fighters may fight the fighter in front of him as opposed to defending against the fighter at his 6-O’Clock. As the supporting fighter, you must ensure that the bandit doesn't engage you and force you toreact defensively. The bandit's nose generally will telegraph his intent. The engaged fighter can also help by informing the supporting fighter of bandit maneuvers. If the bandit stops turning and points at you, maneuver to deny a WEZ. The range you are from the bandit will dictate either staying in the beam or checking into him to make it a 180 degree pass. Avoiding the engaged fighter with an altitude delta, as you extend through the fight, cannot be overemphasized. Power should be back and you should expend chaff and flares as needed. The bandit's extension towards you should provide a shot opportunity for the engaged fighter. If not, then continue with your supporting duties. However, if the bandit continues to turn defending himself against the engaged fighter, it should, based on range and aspect, offer a shot of opportunity, or a position from which an entry into the fight can be made if the engaged fighter needs your help.
4.10.8.1. Areas to Avoid
The supporting fighter must avoid three areas in order to fulfill his responsibilities: staying directly above or below, and within 2 NM of the fight. Flying directly above or below the fight forces the supporting fighter to focus his attention on the fight instead of clearing the area for other bandits. If an entry is attempted, the supporting fighter must fit his turn into an already tight and, most likely, slow turning fight. Although possible, this maneuver is very difficult and often results in an overshoot because of the inability to slow down in a very nose low attitude or extend away from the fight after being extremely nose high.
Trying to stay inside 12,000 feet of the fight may allow the bandit opportunities to employ ordnance against the supporting fighter. This range may also not provide the supporting fighter with the needed turning room to employ ordnance. This causes (at best) rushed shot opportunities and (at worst) missed shot opportunities due to minimum range.
4.10.9. Break Away Turn Away
If the bandit breaks away from the supporting fighter (Figure 4.47), the quickest way to achieve fight separation and a supporting position is to simple check 30 degrees away and extend with afterburner. Again attempt to maintain 450 knots or greater during the extension and build needed separation.

Figure 4.47 Break Away
4.10.10. Break Into
If the bandit breaks into the element (Figure 4.48 & Figure 4.49), the supporting fighter has three basic options to option the desired fight separation; Straight Ahead Extension, Lag the fight, and Bracket.

Figure 4.48 Break Into (Turn Into)

Figure 4.49 Break Into (Turn Away)
4.10.10.1. Straight Ahead Extension
Fly BFM to meet the bandit with high-aspect(Figure 4.50) and split plane to extend through the fight.
Once to the outside of the fight the supporting fighter should turn in the dire ction that is easiest to maintain tally/visual with the fight. Whether your turn places you Co-Flow, same turn direction as the fight, or Counter-Flow, opposite turn direction as the fight, it doesn't matter. The point is your position away from the fight will offer you an entry if the engaged fighter needs your help. Advantage of this is it allows the supporting fighter to unload and extend gaining knots while the bandit is bleeding down energy due to the defensive turn. Also, if the bandit blows up, the element is in a excellent position to egress the fight with good mutual support.

Figure 4.50 Straight Ahead Extension
4.10.10.2. Lag The Fight
This option has the supporting fighter point at the lag entry window (as you did in offensive BFM) and flying behind the engaged fighter. This will place the engaged fighter and the bandit on the same side of your canopy and place you in lag with the fight. A high tactical airspeed is required to fly the larger circleabout the fight. Ensure to select afterburner at the beginning of the maneuver. Again a ttempt to split plane in the opposite direction as the fight. This position will allow the supporting fighter to visually check the six of the engaged fighter and radar sanitize the supporting fighter's soon to be six as he turns to keep the fight on the beam. A Co-flow/Fan geometry is setup from this maneuver.
4.10.10.3. Bracket
Bracket is similar to the break away turn away initial move however, a ve rtical spilt is definitely required. Simply check away from the fight to place the bandit between the engaged fighter and you. Once the bandit's nose rotates through you are outside the fight and can maneuver accordingly based on fight status. Advantage of this is if the engaged fighter is denied an offensive position due to effective bandit reactions the supporting fighter is in a good position to engage quickly for a shot of opportunity or an exchange of roles. The disadvantage to this maneuver is that without a vertical split the supporting fighter can find himself in the bandit's WEZ and possibly have to defensively react to survive.
4.10.11. Fight Entries
The supporting fighter may need to engage the bandit in several situations. These can be classified into two cases: (1) When the engaged fighter is defensive, and (2) When the engaged fighter is in a high-aspect hence neutral fight that may take a long time to resolve. There are two types of entries, entriesfrom the vertical (above or below), or from outside the bandit's TC in the form of Co-Flow (turning in the same direction as the fight) or Counter-Flow (turning in the opposite direction of the fight). Both entries require vertical turning room to be tactically sound. During an engagement where the engaged fighter is offensive the supporting fighter should not be primarily concerned with shots of opportunity unless the engaged fighter either requests it or survival requires it. A survival issue occurs when the engaged fighter has lost the offensive, hence neutral, or as in a high-aspect pass, or a greater number of threats are inbound that the supporting fighter can't split to engage offensive (i.e. the motherload is 10 miles away and heading your way). The reasonable amount of time the engaged fighter now has to maneuver to achieve a kill has been constrained and the flight needs to communicate this to each other. If the engaged fighter cannot immediately place the bandit in a WEZ and shoot, then the engaged fighter should ask for help and clear the supporting fighter to shoot.
The supporting fighter has set up the support structure and is in a position of advantage, usually high to the inside of the fight. This out of plane position, not normally seen in the BFM phase, offers an entry from above. The entry from below is difficult since most turning engagements go downhill very quickly taking away any turning room you’ve gained. If the bandit elects to take it up, an entry from below may be available. Vertical entries are fleeting opportunities and must be accurately timed in order for an offensive entry to achieve a WEZ on the Bandit.
4.10.11.1. Outside Entry
The other type of entry is from the outside of the Bandit's TC. The supporting fighter gets to this position either because he is outside the Bandit's TC at the initial merge or because he passed through the TC once the fight started. There are two types of outside entries Co-Flow and the Counter-Flow.
4.10.11.2. Co-Flow Entry
As the name implies both the supporting fighter and the Bandit are turning in the same direction (Figure 4.51). You can get a Co-Flow entry if you are outside the Bandit's TC and as the Bandit's extended 3-9 line passes through your aircraft. As you make the entry it resembles the Heat portion of the Heat-To-Guns exercise. For this entry to work the supporting fighter has to be split plane with the Bandit.
If the supporting fighter is in plane with the Bandit, then the potential of getting shot as the Bandit's nose passes through you is very likely. That will probably result in the supporting fighter reacting defensively to the Bandit's threatening nose and does nothing to support killing the Bandit. If in the proper supporting position 2-3 NM offset and with 4000 feet of split plane, the supporting fighter is turning in the same direction as the fight, flying straight lines and hooks. As the bandit's turn brings his 3 - 9 line to your jet, start a turn back into the fight to place it at left 10 or right 2 O’Clock, whichever way is easier to maintain sight. Remember you’re supporting and at this moment all you should be doing is denying the Bandit a WEZ by rotating you're heat source away from the Bandit. As the Bandit's nose rotates through you it should, based on range and aspect, it may offer a shot of opportunity, or a position from which a Co-Flow entry into the fight can be made if the engaged fighter needs your help. If the engaged fighter does not need help, continue to sanitize with the radar and visually sanitize your 6 o'clock and the engaged fighter's. If no entry is available or required, check away from the fight by placing it at your 5 or 7 o'clock. The bottom line: don't put the fight on the nose unless you are taking a shot.
MCH 11-F16 Vol 5 10 May 1996 91
Figure 4.51 Co-Flow Entry
4.10.11.3. Counter-Flow Entry
As the name implies the supporting fighter and the Bandit's turn are opposite of each other (Figure 4.52).This entry is very similar to the Co-Flow entry. The major difference between the two is the frequency at which an entry opportunity occurs. Since the supporting fighter is flying in the opposite direction the fight is turning, the bandit’s 3 - 9 line will pass through him more often than in a Co-Flow entry. The supporting fighter must strive for lateral and vertical offset quickly. The cues for when to turn in are similar to the Co-Flow except you can turn slightly earlier (lead turn). The geometry is similar to the way gears mesh together. Play the turn to get a belly entry to the control zone.
Figure 4.52 Counter-Flow Entry
4.10.12. Role Exchange
Role changes must be positive, clearly communicated, and properly executed by BOTH fighters or grave consequences will arise. The CAF continues to run aircraft into one another because two fighters are trying to offensively engage the same bandit simultaneously. The key to success is that both fighters are maneuvering in relationship to the bandit. The engaged fighter is maneuvering to employ ordnance from the "Classic" engaged BFM position and the other is supporting him, not actively employing ordnance until called upon by the engaged fighter. Prolonged turning engagements will only decrease the flight members’ situational awareness and could jeopardize survival. The engaged fighter communicating the need for assistance, during offensive maneuvering, is the key for the supporting fighter to actively work for an entry or take a shot of opportunity. The engaged fighter's proximity to the bandit, and weapon FOV, will dictate when the supporting fighter needs to maneuver for an entry or for a shot of opportunity. The supporting fighter, when not offered a shot of opportunity, should be able to maneuver to the control position at the role exchange. If the engaged fighter asks for assistance, ( "Viper One, Neutral"). The supporting fighter tells the engaged fighter where the entry will come from (i.e. "Viper Two, entry high, from the north"). The "Standard" engaged fighter reaction should be to acknowledge the supporting fighter's radio call immediately, (because the supporting fighter's entry is fleeting and may not exist in 5 - 10 seconds), with either "Cleared In" or "Negative". The engaged fighter should respond with "negative" if he is again able to maneuver to employ ordnance on the bandit. If the engaged fighter clears the supporting fighter to enter, the "standard" reaction should be for him to aggressively maneuver low to the outside of the fight and assume the supporting role. During the exchange the supporting fighter continues to be responsible for flight path deconfliction between himself and the engaged fighter until the roles have been positively exchanged and the engaged fighter is visual (Figure 4.53).
Figure 4.53 Role Exchange
In this case Viper One called off with "Blind", therefor as Viper Two assumes the engaged role he has to provide Viper One with the visual. The role change is complete only when the pr eviously engaged fighter transmits either, "Press," or calls "Tally/ Visual, press", whichever was briefed as "standard." The previously engaged fighter can't simply disregard the bandit during this phase, he must still maneuver in relation to the bandit until the bandit either blows up, or is no longer a factor (i.e. the bandit sees the supporting fighter attacking that attack, or disregards the disengaging fighter and attempts to extend from the fight). The flight members must thoroughly understand these roles and, most importantly, how to change roles, especially in a degraded communication environment or if the visual can not be maintained.
The following is another example:
"Viper 1, Engaged, bandit, right 2, 2 miles."
"Viper 2, Press."
"Viper 1, Neutral."
"Viper 2, Entry high from the north."
"Viper 2 Cleared-in, 1's blind."
"Viper 2, Engaged. Your visual 10 o’clock, high, 1 mile." NOTE: In this situation, even though Viper 2 is now the engaged fighter, he is still responsible for element deconfliction until Viper 1 is visual. If the rapidly changing situation prevents this, call blind.
"Viper 1, Press." (Viper 1 now assumes responsibility for element deconfliction)
4.10.13. Shots Of Opportunity
A shot of opportunity for the supporting fighter exists whenever the bandit is in a WEZ, the engaged fighter is not in the field of view (FOV) of the weapon during its entire time of flight, the bandit's debris will not be a factor to the engaged fighter and the supporting fighter will NOT enter the engaged fighter control zone ( that airspace between the engaged fighter's nose to the bandit). If adequate distance is not provided for, the bandit's debris could endanger the e ngaged fighter. As a ROT for a missile shot of opportunity, the bandit's aspect to the supporting fighter should be approaching the beam. The engaged fighter should not be within the supporting fighter's HUD FOV, and the engaged fighter should be approximately a turn radius (4-6,000 feet) from the bandit, and the supporting fighter is about 9-12,000 feet away from the bandit with altitude deconfliction. This distance will change in regards to airspeeds font size="3">and closure between the bandit, the engaged fighter, and the supporting fighter. To employ the gun the supporting fighter is going to have to perform a role exchange to be allowed the engaged fighter's airspace. Under most circumstances the gun opportunity will be fleeting and should only be attempted if it's the only shot available due to being winchester missiles. During a shot of opportunity the supporting fighter is always responsible for deconflicting with the engaged fighter. Shots of opportunity support killing the bandit quickly, thus minimizing a turning engagement and allows for higher SA (exactly what you want to do in a combat situation). It is important that flight leads brief in detail, the contract for shots of opportunity.
4.10.14. Egress
When the bandit has been destroyed, the fighter who has the highest situational awareness should initiate the egress. Normally after a turning e ngagement this will be the supporting fighter's responsibility. By listening to GCI (real world) and maintaining overall situation awareness choose an avenue to egress. Getting the flight moving in the same direction away from the expect threat is the priority (In the MOA/TRA pick a heading, any heading just get the flight moving to the egress). Remember to use directive then descriptive comm ("Viper 1 reference 180," . . .pause. . "Viper 1 visual right 3 O’Clock slightly high" ). Have the afterburner in and get low to isolate the threats above you. It is not imperative that the element be in perfect 6-9,000 LAB formation, but at least visual and heading in the same direction. The fastest fighter will be the one to adjust the formation to regain visual mutual support. Don't have the slow fighter doing excessive maneuvering close to the fireball. Wait until you are 3 - 5 miles away from the fireball and then maneuver the fo rmation to achieve line-abreast. If the slow fighter is out front, the fighter with the higher airspeed will be able close the range and si mple fly into
position. Get the radar in ACM Slewable or Range While Search (RWS) mode and visually check 6 o'clock. Once you are assured there are no threats within 10 miles, then resume pre-briefed search responsibilities. GCI should be queried for a new picture to start building your situational awareness outside of 20 miles. Now continue with your mission objectives.
4.11. 2 V 1 Defensive Visual Maneuvering
There are four priorities which the element must satisfy in order to survive a defensive situation. They are; detection, negating the threat, maintaining flight integrity/ mutual su pport through role execution, and lethal weapons employment against the bandit. When the flight finds itself under attack, the obvious concern is survival (negating the bandit's initial attack). Because fractions of a second are very important, the flight must have some preplanned initial moves; actions that they are very familiar with and have thoroughly practiced. As you would expect, these moves will be based on defensive turns.
Once the initial attack has been negated, the immediate concern of the flight should be to go offensive or separate. Reestablish visual and positional support and maintain tally on the bandit to be sure he is out of range. If the separation is not going to achieve sufficient range, the element will need to continue defensive maneuvering to deny the bandit weapons parameters. The element should use chaff/flares as appropriate. If it is apparent from the beginning that the flight cannot separate, we have to sandwich the bandit and kill him or force him to separate. Engaged and supporting fighter tactics are now in order. In this case, however, the bandit determines who is engaged (the one he attacks); the other fighter then maneuvers to sandwich the attacker and bring ordnance to bear.
If both fighters are tally and blind, it is imperative that roles be established. Positive communication and effective maneuvering must be accomplished by both fighters to ensure friendly flight path deconfliction. The flight lead is ultimately responsible for establishing these roles, element survival, and training rule compliance. References off the bandit and/or separate altitudes to ensure deconfliction will help both fighters achieve the visual while increasing SA.
4.11.1. Pre-Engagement Considerations
Your highest chance of being engaged defensively is with loss of situational awareness. This may occur due performing other tasks and not reali zing the fact that you're detected. Prevent this by performing a good cross check of the radar, RWR, and visual lookout. Detecting the threat at range (out of a WEZ) is a lot better than noticing a MiG at missile or jinking at gun range reacting defensively for survival. The use of good formation position, visual search, on-board and off-board sensors are required to provide the needed detection of the threat early enough to avoid a defensive situation. As a member of a flight you must make it a priority to mai ntain the briefed formation, visual and radar search responsibilities within the formations.
Line abreast formation is desired. The formation flown will provide a common reference for communications, targeting, and firepower. The lateral distance between the two fighters depends on several factors ( turn radius of the fighters, WEZ of the fighters, and depth of visual coverage needed for "threat" detection). There are known "blind" zones and human factors that come into play here. The "blind" zone is the area at your extreme deep six that you just can't see due to cockpit field of view. By being in a line abreast formation at least one of the fighters can see into the others "blind" zone and provide the necessary warning when the "threat" is detected. Visual lookout or search must be disciplined: the guns area, IR missiles area, and the All-Aspect Missile area. These areas must be searched using a time share approach. Start with formation position. A look at your flight mate will do three things for the visual search right away. It will assure you are in formation position, correct your "biological" limitation of refocus, and search the area beyond the flight mate for a threat. Next check your flight mate's deep six for a threat in guns range first, then IR missiles. Don't just look for an aircraft. Look for apparent motion, canopy glints, cons, and angel hair. Don't forget to check high 12, low (Belly- checks), and level 3 - 9 as well - a BIG TASK ! If during a look inside the cockpit a "spike" is observed don't keep it to yourself communicate that fact to the flight ("Viper Two, Spiked, 10 o'clock). Now start a dedicated search in the avenue of attack. But, don’t' forget everywhere else like inside the formation, 6, 12 o’clock and outside the formation. That "spike" at 10 o'clock may be 20 or 30 miles away and the real threat that is going to kill you is at your 3 o'clock for 2 miles attempting a silent intercept.
Disciplined radar search will ensure that a specific airspace out to a specific range has been sanitized. Through overlapping of elevation and azimuth coverage early detection of the threat is permitted. However, expect the unexpected. The radar doesn't paint all targets that are out there; in any case, it can’t see what's behind rocks and so forth. Early detection allows you the ability to prosecute the attack offensively rather than reacting defensively to the unseen attack, thus increasing your chances for survival.
When a "contact" is observed on the radar again communicate this to the flight (Viper 2, contact 5 Southeast Bullseye, 15 Thousand, Head). Together all three of these, formation position, visual and radar search provides for immediate positional awareness of the other flight members.
When the bandit is located (dependent on range and relative position), either split the element laterally and vertically and increase your airspeed, or perform a hard turn or break turn into the bandit. Hard turn is used when the Bandit is not yet in range to employ ordnance. A "Break" turn is used when you locate the threat and someone is in a WEZ. If you are unsure call for a "Break" turn. The directive call for abreak turn implies that on board counter measure will also be automatically employed, (i.e. chaff and flares are expended). Never do anything with two that you wouldn't do by yourself, i.e. dragging the bandit at your 6 , holding him off, using yourself as bait, - DEFEND YOURSELF NOW! Radio calls will normally initiate any move the formation takes. The key to effective communication is to spit out the information IN ORDER using directive then descriptive comments, as discussed earlier. Attempt to assess which fighter the bandit is trying to attack. Avoid flying too close together or level, allowing the bandit to simultaneously detect both fighters in the formation. Adhere to the briefed formation and perform split plane maneuvering. You must negate the threat by employing sound defensive BFM. If your flight mate can assist you by killing the bandit, that’s great but never depend on assistance from the outside to SURVIVE an attack!
Maintaining Flight Integrity/Mutual Support and Role Execution: Remember what was briefed by theflight lead as "The Contract" and adhere to it. Fulfill your formation responsibilities (Formation position, Visual and radar search), Engaged and Supporting roles, and use proper radio communications. Survive first, then provide all the support you can. Understand the rendezvous/reform plan your flight will use if stripped (i.e. outside of briefed formation parameters) and use them to regain mutual support as quickly as possible.
The basis of our successful two-ship defense is a system of well thought out initial moves. The moves must effectively negate the initial attack, so they must be aggressive and designed to rotate our vulnerable cone away from the threat. There is no room for error, so the moves should be simple and easy to remember. Lastly, the moves need to become almost second nature; only practice will help here. The main principles to follow in accomplishing initial moves when the bandit is sighted in the aft quadrant approaching missile range are:
· When defensive, avoid putting both aircraft in the same area at the same time. When possible, utilize split plane maneuvering
· The pilot with the tally should always:
· Do sound BFM by starting a hard/break turn into the bandit.
· Direct the flight to turn (left or right).
· Dispense chaff and flares if threatened.
NOTE: Attempt should be made to accomplish all of the above items simultaneously.
The pilot without the tally should:
· Perform the turn directed in the direction called.
· Dispense chaff and flares.
· Attempt to acquire the tally.
4.11.2. Lethal Weapons Employment
If you are the supporting fighter while your flight mate is defensive, you must maneuver immediately for a shot of opportunity. Attempt to obtain a radar lock by using 10 x 40 ACM or Bore Sight. A radar lock is not required to employ an AIM-9. Ensure the range, angles, and tone are satisfied then shoot the bandit. Don't forget all the BFM skills you've learned. Remember to assess the range and aspect, and maneuver accordingly. Remember the lessons learned in Offensive BFM regarding WEZ management and the recognition that the Bandit is in a WEZ. Now is the time to utilize those skills.
4.11.3. Execution of Duties
If the flight is in a WEZ then "break" all flight members in the direction that will allow the best defensive BFM to defeat the attack (i.e. if you see the bandit break the formation so you can maintain sight). Now the task of the defensive fighter, the "engaged fighter," is to fly his best BFM to survive the attack. The supporting fighter needs to maneuver to a WEZ to employ ordnance quickly.
4.11.4. Classic Sandwich (No Switch)
A bandit shows up (Figure 4.54) at your flight mate's 6 O’Clock ("Viper break left"). If the bandit continues to attack the initially engaged fighter (in this case your flight mate), the bandit should quickly become sandwiched by the supporting fighter. The "sandwich" is an ideal defensive maneuver and should allow the supporting fighter an opportunity to achieve weapon parameters and kill the bandit. Attempt to obtain a radar lock by using 10 x 40 ACM or Bore Sight. Do not allow the lack of a radar lock hinder you from employing the AIM-9. Ensure the range, angles, and tone are satisfied, then shoot the bandit, especially if the bandit is in close and employing ordnance against your flight mate. Flight path deconfliction with the defensively engaged fighter is the responsibility of the supporting fighter just as in an offensive engagement.
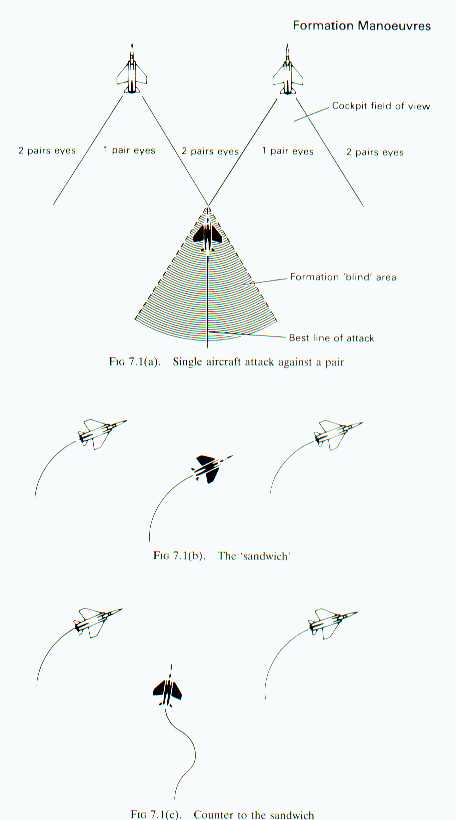
Figure 4.54 Sandwich
4.11.5. Early/Late Switch
If the bandit is aware of the other fighter a "switch" is probable. The switch must be communicated so the engaged and supporting roles can be fulfilled and deconfliction can be assured. An early switch (bandit switch prior to turn circle entry) will enable the initially defensively engaged fighter to change to a constant turn defense or an extension since the ba ndit's nose will definitely come off and threaten the other fighter (Figure 4.55). The constant turn allows him to back off on the turn rate to keep the same airspeed, keep the bandit in sight, and continue to rotate his vulnerable area away from the bandit while he offsets his turn circle and looks for an entry or shot of opportunity. The extension a ttempts to regain tactical maneuvering airspeed before attacking the bandit. A late switch (bandit switch inside the turn circle) may allow the supporting fighter to meet the bandit at high-aspect and provide the flight an opportunity to separate from the fight (Figure 4.56). This all depends on the bandit's and defenders BFM.
If the supporting fighter meets the bandit close aboard and the bandit's lead turn is denied, a separation opportunity generally is available depending on energy (>300 Kts) and bandit ai rcraft/ordnance capabilities. The supporting fighter needs to communicate the separation opportunity to the engaged fighter and get the flight going in the best direction (i.e. the way that maximizes the range between the fighters and the bandit.) It is imperative to keep the bandit in sight and to do your best extension. If the bandit chooses to turn and point at the fighters his range and ordnance capabilities must be assessed. If he still appears to be in range and /or you see missiles in the air another defensive reaction is required. If not, keep the tally and keep running until the tactical scenario demands you do something different.
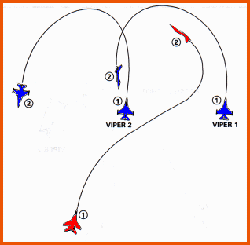
Figure 4.55 Early Switch
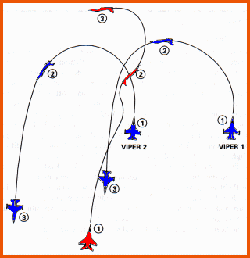
Figure 4.56 Late Switch
4.11.6. Engaged Fighter Unknown/Uncommitted Bandit
The bandit's position may not clearly identify the F-16 under attack. The bandit can come from any aspect. A quick assessment of the bandit's lethality must be made based on range and nose position. If the bandit has not reached a WEZ, an extension (while monitoring the bandit) may be appropriate. If the bandit is a threat, or continues to close, a prompt flight reaction is required. This discussion addresses the principles valid for all potential bandit attack axes. The initial move should accomplish five things: denya shot, present the bandit with maximum BFM problems, force the bandit to commit on one or the other fighter, maximize the element's offensive potential after the initial move, and clearly establish engaged and supporting fighter roles. In the example (Figure 4.57), the bandit enjoys a unique positional relationship in which his offensive potential against each fighter is identical. The element has two choices in their initial defensive reaction.
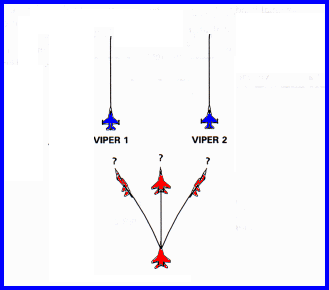
Figure 4.57 Uncommitted Bandit
The first option is to break the element in the same direction (Figure 4.58) This is the preferred option if the bandit is detected outside of weapons parameters, or has not yet closed inside either fighter's turn circle. If the bandit is allowed to close to either (or both) fighter's turn circle, the possibility the bandit can take a shot on Viper Two before Viper One can threaten the bandit is increased. The bandit may be in a better position on one fighter and may not allow the other to separate.
Figure 4.58 Break in Same Direction
Advantages to this option include:
· Viper One is able to maintain tally throughout his turn.
· The bandit must immediately commit against one fighter or the other.
· His offensive potential versus each fighter is no longer identical.
· Each element member can isolate the threat axis on the same side of their respective aircraft.
The element is in a position to establish engaged and supporting fighter roles based on bandit reaction.
Viper One can devote full attention to his best 1v1 BFM against the bandit. He does not have to be concerned with a flight path conflict with his wingman. Viper Two starts with the bandit's nose in lag and may be able to rotate his vulnerable cone completely through the bandit before the bandit can bring his nose to bear.
Disadvantages are:
· Viper Two may lose tally as he kicks the bandit across the tail. · The bandit has a possible shot opportunity as Viper Two starts his initial turn.
The second option is to break the element toward each other in a cross-turn or hard -to-six turn.
(Figure 4.59). This option is not the preferred one when the bandit is detected outside of weapons parameters or when the bandit is not inside either fighter's turn circle.
Figure 4.59 Cross-Turn/Hard-to-Six
If the bandit is allowed to close before he is detected, the cross turn option becomes less viable (Figure 4.60). At ranges approaching turn circle diam eter, the bandit retains the option to employ a gun shot against either fighter, to meet either fighter at high aspect and separate, or switch the attack from one to the other.
Advantages are:
· Each fighter maximizes the BFM problem for the bandit.
· Neither fighter rotates his vulnerable cone through the bandit's position.
· Both fighters have an increased probability of maintaining tally.
Disadvantages are:
· The bandit is not forced to commit to either fighter.
· The bandit’s decision to commit can be delayed until he is closer to (and perhaps inside) both fighters' turn circles.
· The bandit is able to meet one fighter at high aspect and isolate both fighters on one side of his aircraft.
· The assignment of engaged and supporting fighter roles within the element is delayed. · If both fighters perform hard turns in the bandit's plane of motion, the potential for flight path conflict increases.
· If both fighters maneuver to isolate the threat axis on one side of their aircraft, their flight path vectors are in opposite directions.
· Mutual support is difficult to maintain.

Figure 4.60 Cross-turn—Bandit Approaching/At Turn Circle
4.11.7. Cross-Court
Bandit asymmetrically positioned between the fighters. In this case, the bandit is in a more threatening position relative to one fighter than the other, but is positioned between the fighters (Figure 4.61). Considerations are similar to the engaged fighter unknown or uncommitted bandit discussion and the options remain similar.
Figure 4.61 Bandit Asymmetrically Positioned (Cross-Court)
One option is to break in the same dire ction (Figure 4.62). The direction of break should be determined by the most threatened fighter. That fighter should be directed to break into the bandit. This option is preferred one if the bandit is detected outside of weapons parameters, or if both fighters have tally. Advantages and disadvantages are the same as previously discussed.
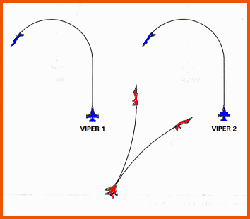
Figure 4.62 Break in Same Direction (Asymmetric Bandit)
The second option is to break the most threatened fighter into the bandit, and to also turn the other fighter toward the bandit (Figure 4.63). The advantages and disadvantages to this option are similar to those in the engaged fighter unknown/uncommitted bandit discussion. However, the bandit is probably already committed to the most threatened fighter. This makes the determination of engaged and supporting fighter roles easier. In the case where Viper Two is the only fighter with a tally, it may be viable for him to turn toward the bandit to maintain tally as Viper One begins his defensive turn. In this case, if Viper Two decides to turn into the bandit, the turn must be at a rate that will keep the bandit outside Viper Two's turn circle, if possible. Floating the turn when the bandit is at close range may allow the bandit to switch the attack and arrive inside two's turn circle. Viper Two should direct Viper One in his no sight defense and direct an extension if the bandit switches or is no longer a threat to Viper One.
Additionally, Viper Two must default to Viper One during Viper One's defensive turn to preclude a flight path conflict from developing. This option is viable if Viper Two is the only one with a tally, or if the bandit is already established inside Viper Two's turn circle.
Figure 4.63 Cross-turn/Hard-to-six (Asymmetric Bandit)
Place the fight at your 10 o'clock or 2 o'clock and strive to have at least a turn radius and a half of room (around 1 NM) between you and the bandit. Split plane maneuvering may allow you to get outside the bandit's FOV. If the bandit doesn't point at you and continues his turn a shot of opportunity should be available. Be ready to employ ordnance as soon as possible. If the fight has gravitated to a scissors you can expect extremely slow airspeeds. The AIM-9 is the weapon of choice. Allow the fight to drift aft to about 7 or 4 o'clock and then turn in to the fight looking for a low-aspect missile shot as the distance between the bandit and the engaged fighter increases and is greater then the HUD FOV. The entry is just like a Co-Flow or Counter-Flow entry. If winchester missiles and the only ordnance available is the gun then maintain at least over-the-top airspeed as you enter the fight and anticipate a high angle gun attack to a high reposition. You don't want to be co-airspeed with the fight and get anchored in the scissors. But being greater than 400 KTAS is also not advantageous to entering a scissors. It doesn’t allow enough time for the shot. Refer to the section on role exchanges for additional information and comm procedures.
4.12. High-Aspect ACM
An optimum entry against a high-aspect threat is the bracket. The goal is to sandwich the bandit similar to that discussed in the defensive ACM section. The only difference is that the bandit starts out ahead of the 3/9 line and with high aspect. A 2-ship spread out to 3-4 miles will allow the flight to maintain visual mutual support and determine which fighter will have the best advantage to engage offensively or take a shot of opportunity at the merge. Communications are critical to determine which fighter will be the engaged fighter. A going-in position that should be briefed is that the flight lead will be the primary engaged fighter. Here is a classic situation that allows for a pre-merge role change to allow the most offensive fighter the engaged role.
As the flight lead analyzes the aspect of the bandit and continues to the merge performing a single side offset intercept, the wingman maneuvers away from the flight to obtain turning room. If the aspect between the bandit and the flight lead remains high the flight lead should clear his wingman to engage the bandit. The fighter who meets the bandit high-aspect assumes the supporting role. As he approaches the merge he should still attempt to achieve a front quarter shot and then pass the bandit as close aboard as possible, preferably placing the bandit between himself and the engaged fighter. This should force the bandit to turn belly up to the engaged fighter. The engaged fighter maneuvers offensively to employ ordnance or pressure the bandit to make him predictable. Any fighter the bandit engages post merge should allow a shot of opportunity to the other.
Off axis bandits pose additional problems. We want to avoid letting the bandit meet both of us close aboard and then maneuvering to place both of us ahead of his three-nine line. The solution here is to have one fighter engage and get the bandit turning while the other maneuvers to a supporting position and subsequently into a shot of opportunity or a role swap when clearly able to be offensive.
4.13. Intercepts
An intercept is the series of maneuvers, using a ground controlled intercept (GCI), Airborne Warning and Control System (AWACS), on-board systems, or dead reckoning, which places the aircraft in a position from which a weapon may be employed, visual identification (VID) can be made, or a visual engagement can be initiated. The tactical decision to "commit" to an intercept is based on guidance and criteria established in MCM 3-1. The type of intercept geometry utilized is based on experience, proficiency, avionics, weather/ night, ECM and tactical considerations. This manual will review intercept basics and the baseline intercept. Some tactical considerations will also be discussed, however reference to MCM 3-1 is necessary for a complete understanding of tactical intercepts.
Figure 4.64 Intercept Basics
4.13.1. Intercept Basics
In the F-16, the intercept problem involves using the radar to detect a specific ta rget, then using the intercept geometry to arrive at a position from which the target can be identified (if required) and weapons fired. To achieve this, the fighter pilot must do these things (Figure 4.64):
· Close on the target.
· Establish ID (may be a continuous process).
· If a beam or stern conversion is required, acquire sufficient displacement from the target (room for the conversion turn).
· Go pure pursuit.
· Obtain a tally.
· Establish a VID if required.
· Maneuver to weapons parameters.
A popular technique for accomplishing these steps is the baseline intercept. This is the foundation upon which more complicated tactical game plans are built. Before discussing the baseline intercept, a few of the intercept terms will be reviewed.
4.13.2. Intercept Terminology
Fighter pilots should be familiar with all the terms listed in attachments 1 and 2 of this manual.
Listed below is a review of a few of the terms essential to intercept geometry.
Aspect Angle (AA): The angle between the longitudinal axis of the target (projected rearward) and the line-of-sight to the fighter, measured from the tail of the target. The fighter's heading is not a consideration.
Antenna Train Angle (ATA): This is the angle between the nose of the fighter and the radar line-of- sight to the target. ATA is referenced in degrees left or right of 0° azimuth on the MFD.
Collision Antenna Train Angle (CATA): CATA is the azimuth of the radar antenna when tracking a target that is on a collision course with the fighter. This is the fighter's quickest route to an intercept/collision/tally with the target. A target on a collision course drifts straight down the MFD. Its azimuth never changes. An easy way to determine CATA for a cospeed target is to subtract aspect angle from 180°. For example, the CATA for a target with a 150° aspect angle is 30° (180 - 150). Figure 4.65 shows these angular relationships.
Figure 4.65 CATA
4.13.3. The Baseline Intercept
This section will provide a very basic and simple review of the baseline intercept. For this discussion, it is assumed that the intent is to acquire some turning room (offset) to complete a conversion turn to the target's beam or stern. There are six steps in the baseline intercept:
· Get on the CATA until 20 miles.
· Get some offset at 20 miles.
· Get a speed advantage.
· Monitor aspect.
· Go single target track (STT) at 10 miles.
· Go pure pursuit at 120° aspect (6 - 8 NM range for a high aspect setup).
CATA Until 20 Miles. The easiest method of getting on the CATA requires the radar to track the target (STT, SAM, or TWS tracked target). Simply turn toward the intercept steering symbol, or steering cross, until it is centered at 0° azimuth. The target is on the CATA when the cross is centered (Figure 4.65).
Offset at 20 Miles. Getting horizontal offset, or horizontal turning room, requires analysis of the target's aspect angle. The aspect angle is most accurately read from the MFD, although the aspect symbol in the HUD is also useful. In this discussion, it is assumed that the fighter has kept the target on the CATA until 20 NM, and then takes the following action:
· If aspect angle is more than 120°, turn to displace the target 40° - 50° off the nose (40° - 50° from center of the MFD). Which direction to turn is a common question for beginners!
· If aspect says "right" (e.g., 160R), turn to put target on the right side of the MFD.
· Look at the aspect caret in the HUD. If it is right of center, turn right, and if it is left of center, turn left.
· Look at the aspect readout in the MFD. Turn opposite of the letter at the end of the aspect readout
(e.g., if the aspect says "15R," turn "L" or left). Figure 4.66 illustrates both HUD and MFD
indications.
Figure 4.66 Cues for Offset Turn
In the case of a non -maneuvering target which began with high aspect (160° - 180°), as range decreases, the target will drift further towards the edge of the MFD and small check turns into the target will be required to maintain it at 40° - 50°. During this phase, avoid gimbaling the target off the scope(and losing contact) by constant reference to the HUD target locator line. Never let the target locator line exceed 50°.
If aspect angle is 120° or less, remain on the CATA and proceed to subsequent steps of the baseline intercept, always remembering the last step (go pure pursuit at 120° aspect angle). At aspects less than 120°, it is possible that the target will be driven off the MFD when turning to CATA. Do not gimbal the target in an attempt to center the CATA symbol. Keep the target at 50° - 55° offset in this case.
Vertical offset, or vertical turning room, can actually be obtained as soon as you know the target altitude. You don't have to wait until 20 NM. Vertical turning room should be at least several thousand feet, weather/terrain permitting. The following advantages of an altitude split may or may not apply to each tactical situation:
· To get out of his radar coverage vertically.
· To use the ground clutter to help hide from his radar.
· To get the most favorable background to pick him up visually.
· To get the most favorable background to hide your jet visually.
· To get an energy advantage.
· To hide in his blind areas.
· To reduce the horizontal turning room required; makes you less susceptible to a maneuvering target.
· To gain airspeed quickly by going low.
· Or to slow your closure by climbing above the bandit. The disadvantages of an altitude split are:
· Elevation strobe control is more difficult at high look-up/down angles.
· If your radar breaks lock, it's harder to re-acquire the target at closer ranges.
· It is easier to lose radar contact on a no-lock intercept.
Get a Speed Advantage: A good rule of thumb is to have a 150 KCAS advantage if coming from below, and 50 - 100 KCAS advantage if coming from above. These rules of thumb are for medium altitude and may have to be adjusted for high altitude intercepts.
Monitor Aspect: Provided the target does not maneuver, aspect angle will decrease continuously after the fighter has taken the correct horizontal offset. An increase in aspect angle at this point means the target is turning into the fighter. A rapid decrease in aspect angle means that the target has turned away.
How to handle a maneuvering target will be discussed later.
Go STT at 10 Miles: This will enhance the chances of retaining the lock through the conversion turn.
One of the easiest methods of obtaining STT is moving the dogfight/missile override switch to a position programmed for ACM. Aircraft block differences and personal switchology techniques will dictate other methods.
Go Pure Pursuit at 120° Aspect/6 - 8 NM: The 6 - 8 NM is not a hard and fast rule, but in most head- on setups (initial aspect 160 - 180), the 6 - 8 NM point occurs at approximately the same time as aspect angle reaches 120°. The important thing to remember about this step is to go pure pursuit (get the TD box in the HUD) anytime the aspect reads 120°. No matter what the aspect, go pure pursuit not later than 5 NM. This is where the F-16 excels due to its avionics and small size. Use the HUD target locator line to bring the target into the HUD field of view. During conversion from a high-aspect setup, at 3 - 4 NM range there should be approximately 90° remaining to turn. The fighter may already have a tally and be in parameters for a missile shot. Use BFM as required to maneuver into weapons parameters.
4.13.4. Night or IMC Intercepts
Reference night or IMC intercept discussion in Section 8.
4.13.5. Wingman Responsibilities
The wingman's primary job during an intercept is to su pport lead to the merge. This includes:
Checking six o'clock for the flight, targeting threats to lead's merge, engaging bandits not targeted by lead that are a factor, or calling lead off an engagement to deal with a higher threat. To perform these functions, the wingman must be able to do three things: (1) maintain formation, (2) communicate on the radio, and (3) employ valid weapons to kill.
4.13.5.1. Maintain Formation
A typical deployed formation for a tactical intercept is 5000' to 7000' out, 30 ° to 45° back with an altitude stack (see trail formation). If deployed to the inside of the turn, stacking high may cause loss of visual under the canopy rail during the conversion turn. A low stack solves this problem. If deployed to the outside, strive for the most forward position possible and maintain an energy advantage by stacking high. As lead converts on the bandit, flying in the low/inside position requires caution to not be pushed out in front of lead's 3/9 line. On the other hand, the high/outside position requires anticipation to use altitude to accelerate and avoid being trapped at lead's six o'clock as the merge occurs.
4.13.5.2. Communicate on the Radio
Efficient communications mean a rapid, meaningful exchange of information occurs to enhance everyone's SA on the problem at hand. When GCI talks to the flight, lead should answer. If all he can say is "Viper One, clean", then at least GCI knows comm is good. When interflight communication occurs, both element members must say what they know or don't know. "Viper One, contact two groups, 10 NM west bull's eye," followed by silence is not communication. Viper Two must respond with "Viper Two, clean/same" or whatever he has. As the intercept progresses, any changes in what the element sees must be communicated and acknowledged. The ability to intercept what is on the radar is a prerequisite to communicating what you see. Target formations, maneuvers and tactics are explained in MCM 3-1, Volume 2. Remember, when lead talks or something changes in the radar scope, a radio call is required. Radio calls should be as complete as possible. "Viper Two, contact" tells lead nothing about the contact's position, altitude, formation, maneuvering, or possible intentions. Often a wingman will only give part of the information available in an attempt to be brief. An incomplete radio call that begs a question will require extra radio calls.
4.13.5.3. Weapons Employment
Valid weapons employment is the only thing that will kill threats to the formation. A precise knowledge of the weapons envelopes, as well as the leader's criteria for engaging, will allow efficient weapon employment. For example, lead may brief the wingman to shoot any confirmed target within 45° of the nose and 5000' of altitude. This rather restrictive criteria allows the wingman to engage threats within those parameters while maintaining formation integrity.
4.14. Gun Employment
The F-16 is one of the most lethal fighting machines in the world today. The combinations of missile technology and F-16 avionics make weapons employment in the tactical arena more effective. Missile employment is contained in MCM 3-1. The following discussion will center on gun employment.
Gunshots range from very controlled tracking opportunities to very dynamic snapshot situations.
Apparent LOS relative to the shooter and the defender's turn rate capability dictate which type of shot is available; tactical considerations dictate which is the most feasible. Every gun opportunity must be judged and handled with proper concentration given the trade-off between target destruction and your survival.
How predictable can you be? How much energy can you expend and what will you do after the shot? Can you afford the time to take the shot?
4.14.1. Tactical Considerations
There are two basic situations where gun use is required: when the gun is the only available weapon, and when a target of opportunity (inside the missile minimum range/angle envelopes, but within gun parameters) presents itself. Gun solutions, especially in a dense air-threat environment, are fleeting in nature. You must see the situation approaching, react quickly to "fine tune" the gun solution, then kill or damage on the first attempt. But think twice about the time and energy dissipation required to generate such a situation if it does not already exist.
4.14.2. Attack the Cripples
Ideally, this would be an inexperienced pilot separated from his flight, low on fuel and energy, with no tally. Time to kill will be minimum in this situation. The bogey you would not choose to gun will be on the opposite end of the spectrum; he is experienced, has energy, fuel, and a tally, and his flight is with him. Minimize all solution errors which are controllable. There is one parameter which minimizes ALL errors associated with a dynamic air combat gun solution range. Get in close to improve your Pk.
Gunshot opportunities in combat are rare. Don't save rounds for other bandits, fire a lethal burst (generally 1 - 2 seconds) on the one you're engaged with, then immediately reposition to avoid the resulting fireball. Once separating, assume you've been ta rgeted by a new threat (you've been very predictable and not checking six while getting your guns kill) and maneuver your jet accordingly.
4.14.3. Gunsights
Four different sighting references are available for use. The gun cross, the lead computing optical sight (LCOS), and the snapshot sight (SS) are available in all F-16s and the enhanced envelope gunsight (EEGS) is an added option in the F16C. Refer to T.O. 1F-16-34-1-1 for information on HUD symbology.
The gun cross is always available and easily used. You can effectively imagine the gun cross as being where the gun barrels are pointed. Proper aim is achieved by positioning the gun cross in the targets plane of motion (POM) with the proper amount of lead. The gun cross is a very good reference to use to initially establish yourself in the target's POM with some amount of lead. As range decreases, you can then refine the lead angle by referencing the LCOS/EEGS pippers before firing. Without EEGS, the gun cross is the only usable reference during very dynamic, high aspect angle shot attempts.
The LCOS pipper represents a sighting re ference for which the gun is now properly aimed. This pipper helps the pilot establish the proper lead angle to kill the target. The key LCOS assumption is that the pilot is tracking the target with the pipper. In addition, target acceleration and shooter parameters
Thus with these techniques you will have a better capacity to out maneuver your opponents and obtain the kill.