Soviet/Russian Defensive Intercept Tactics
To fully understand the proper tactics to employ, you must have a complete understanding of the threats.
Defensive Intercepts can be divided into three sections:
1) High Speed High Altitude Standoff Threats(Such as the B1B, Tu22M, & Blackjack Bombers)
2) Low Altitude High Speed Penetrators(Such as the F-111 & Su-24 Fighter Bombers)
3) Stealth Threats(Such as the F117 or B-2 Bombers)
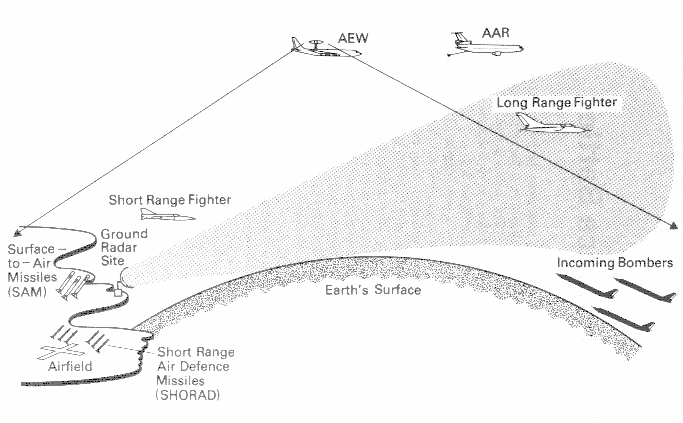
Standoff (High Altitude) Aircraft are the biggest threat in a combat situation.
These aircraft are capable of firing ordnance from all
ranges. They can fire Long-Range Cruise missles and Medium-Range Radar guided munitions, and then disengage before you can intercept them. This is something
the Penetrating (Low Altitude) Aircraft cannot do.
Highspeed Low altitude penetrators can escape from you in only specific circumstances,
unlike the standoff aircraft they must manoeuvre in close to place
their munitions in the section of the highest Pk (Probability of Kill). This means
that although the Standoff Platforms are a bigger threat, Enemy Penetrating Aircraft should
always take precedence over them in your task prioritisation.
Stealth Aircraft are deadly. This nearly undetectable threat can destroy any high value target at almost any given moment. With the other
threats, you can manoeuvre to defeat them with missiles or gun solutions due to the ability to track them with IADS. The Stealth threat has already bypassed this system and has a distinct advantage until located. Once located the Stealth aircraft is usually an easy kill due to thier inherent aerodynamic and power limtiations. Also the geometry in relation from the enemy threat identification to your aircraft location makes the intercept solutions much tougher for the Stealthy Threat.
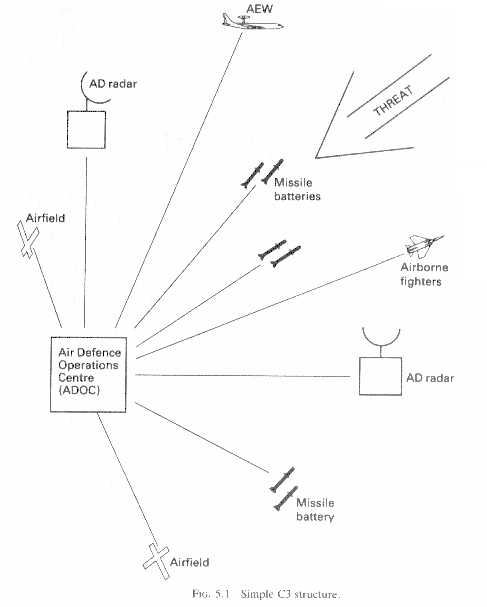
IADS
As stated in the Previous IADS Chapter
the intercept will usually be controlled by either ground based (GCI) or an airbased controller(Such as AWACS or Mainstay). Synchronisation means that the IADS co-ordinates each of its assets
to Intercept the threats(Fig 5.1).
.
Redundancy has a two-fold meaning in the IADS. One meaning is that
the various systems back each other up, or for example the Intercepting Aircraft are
placed within the lethal envelope of the High and Low altitude SAM
systems. This means that no matter where the threat aircraft is it can
be engaged with maximum Pk.
A typical scenario of how this works.
A flight of Four high flying enemy aircraft are detected inbound by
the early warning radar station, but have not yet reached the engagement
zone of the forward Air Defences (Thus thought to be Standoff threats). This information
is passed to the SOC (Sector Operations Control) in the C4 net (Connectivity
in Operation). The SOC decides that these aircraft will become a threat
in the near future and orders the EW radar to maintain a track on the
flight. At the same time the SOC sends the data it has received to
the ADOC (Area Defence Operations Control), a second Low altitude flight of two penetrating fighter bombers is detected within the forward defense zone. These aircraft are now considered a higher threat and IADS reassigns the high altitude threats as secondary and vectors interceptors to the new targets.
The enemy flight gets to the inner range of the MSAM defences, the
EW radar passes this info to SOC, the SOC organises and orders the
relevant actions, based upon the resources it has. The SOC decides
that a Interceptor based look down engagement is required, and passes the required
information (speed, altitude, heading, location) to the PVO
HQ that will engage the bandit, (an example of Synchronisation). The
HQ will assign specific areas for the Interceptors to search with their look down radars. Once detected by the Interceptor the threats will be engaged with the appropiate air intercept missles, while at the same time IADS is backing up the interceptors with SAM and AAA assets to engage the threats if the interceptors fail to destroy them.
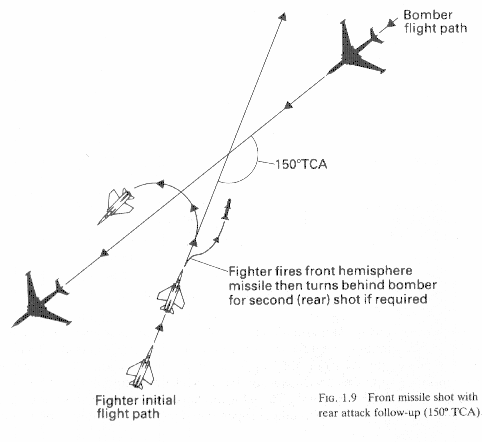
The Bogies are identified as F-111 Fighter Bombers most likely on a Strategic SEAD/STRIKE mission to destroy air defense assets with the MSAM to allow the follow on high altitude threat to penetrate far enough into the region to employ their standoff weapons. On this day both F-111s are destroyed by a combination of SARH missles at BVR range and followup attacks by IR missles from close range(Fig 1.9) as the remaining F-111 is boxed in by Interceptors and SAM/AAA batteries.
Also during this time, the SOC has kept the ADOC informed as well as
the other Air Defence units in the region that the High Altitude threats are converging on the far outer region of the MSAM and the ADOC has vectored another Interceptor Flight to
engage the threat aircraft. Also allocating the proper SAM assets to again backup this flight.
When the enemy flight enters the WEZ of the Intercepting Airtcraft, this information is passed to either GCI or ACI for guidance
of the Interceptor for positioning prior to the attack run. The interceptor's radar, which then tracks the enemy flight,
designates targets for missile launch, at which point the either the GCI or ACI gives the final vectors for the interceptor for his attack run to place his interceptor in the most adventageous position for
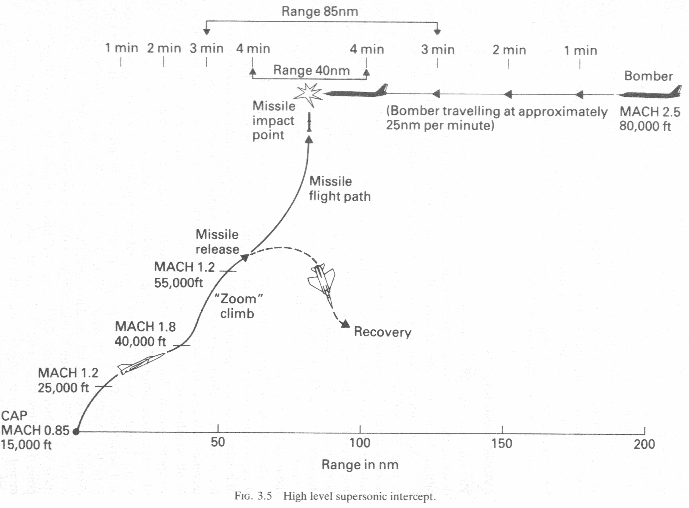
guidings the missile to the high altitude high speed target via semi-active radar guidance or active radar guidance with midcourse data link(Fig 3.5).
At this point, two things could happen, the flight could be destroyed,
or the flight could evade. Lets say the flight has partially evaded the missiles with the loss of 2 out of 4 Bombers while at high altitude,
and has transferred now to a low-level flight to evade the medium-high
altitude, long range air defences (MSAM). The flight has penetrated
the outer 'belt' of defences. The IADS SOC has already passed information
to the other defences in the vicinity, so they are prepared and are
looking for the target. A group of Air Defence fighters on their way
to the FLOT engage the flight as a Target of Opportunity using SARH missles,
the flight however survives due to the inability of these srtike fighters to press home their attacks. This engagement is reported to the SOC,
who have another fix on the targets heading and position.
This information is used to plot possible targets, and SHORADS (Short-Range
Air Defence Systems) at the possible targets are
informed. The flight was also identified by the Fighters as a two
Ship B-1B flight. This means that the flight is most likely on a Strategic
Strike. The SOC orders the Long range radars to keep track, whilst
the PVO scrambles additional fighters to intercept this now higher value threat.
The radar at an Airbase detects an incoming flight, and passes this information
through the net to the SOC, and the SHORADS at the airbase, the SA-3
at the airbase picks the flight up on its tracking radar, but the B-1B's
have already drowned the site in ECM/ECCM, and the SA-3 site rendered useless, but due
to the collocation of the AAA at the Airbase, the IADS is still able
to prosecute an attack on the flight.(an example of redundancy). The
Radar at the Airbase is also targeted and shutdown.
The AAA at the base switch to their visual systems and inform the SOC
they have done so, the B-1Bs don't get any indication of the AAA at
the Airbase, but the EW radar, that first picked them up, is still
showing up, but is not an immediate threat. The AAA at the base is
kept up-to-date via the C4 net from SOC. The aircraft are acquired
visually, and when within engagement range, the AAA turn on their aiming
radar, which gives them a much larger Pk. The two inbound B-1B's don't
have time to react before the AAA guns engage and one is destroyed by a combination of older
barrage fire from the ZSU-57's and aimed fire from the ZSU-23-4's.
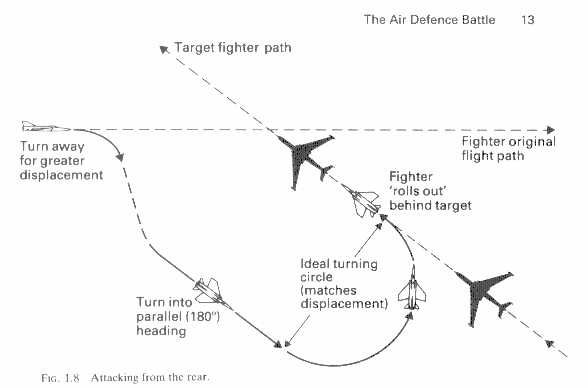
The threat is reduced but not destroyed. During this time, the second flight of interceptors have entered the area and are converging on the threat. Within moments both fighters aquire, engage and destroy the remaining B-1B after being vectored into an offset position to engage the Bomber with a rear attack(Fig 1.8). Thus both types of threats(high and low) have been destroyed and integrity returned to the IADS controlled area.
Now we will discuss the proper Air Tactics to enable the maximum benefit from these assets.
You as the Aggressor Pilot will always be in the advantage over your attacking opponent. To Successfully defeat the attackers you must use all possible assets to assist you in his destruction.
Therefore you MUST keep Situational Awareness of your Exact Location in relation to the IADS system and its resources.
Whenever possible "drag" the attacker into the SAM defense envelope or Force them into the WEZ of the AAA Gun positions. You do not have to personally obtain the "kill" to fulfill your mission. As NVAF Pilots in the Vietnam War soon discovered, all you need to do to defeat your enemy is to disrupt his attack.
Forcing him to evade or jettison his weapons before target release will be just as effective as a kill. This can be best accomplished by using the IADS to your advantage. Maintian a Strong Formation and allow GCI/IADS to guide you to proper position and inorder for you to maximize the full potential of the entire IADS and all its weapons.
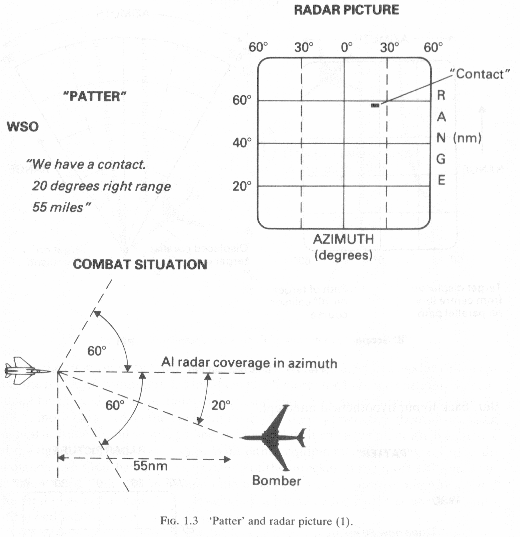
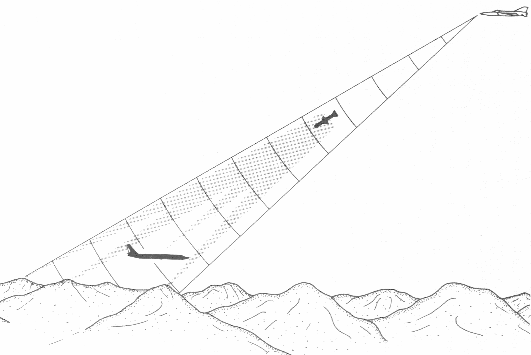
From that position it is imperative that you understand the geometry of interception in its purest form. This is the "Radar Picture" and what it tells you(Fig 1.3). GCI will get you to within Radar range of the inbounds. From that point on it is up to your flight lead as to how you position yourself for attack. Most often then not this is dictated by the "Radar Picture" of the bandit. This tells you his course, speed, and elevation.
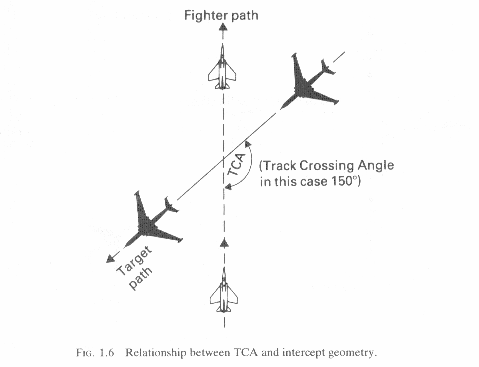
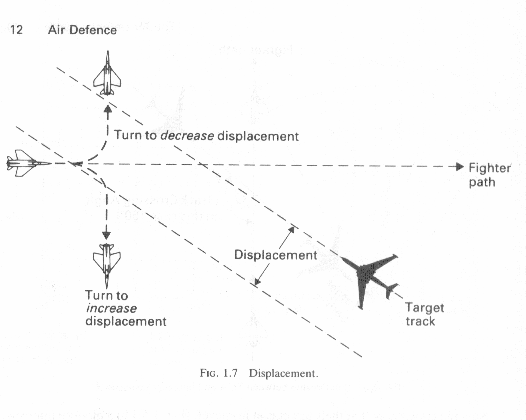
In this case the picture will reveal that the penetrator is on a crossing flight path to your fighter(Fig 1.6). From this information the lead must make several crucial decisions. Whether to attack frontal or rear aspect of the target, this decision in turns dictates a break to either the left or right to decrease or increase displacement from the bandit(Fig 1.7). Which is chosen is depending upon the selected attack. This type of attack is often dictated by the weapons the pilot intends to employ.
For a frontal BVR shot the pilot will turn in to decrease displacement of the Track Crossing Angle(TCA). This will allow him a margin for error if his BVR shot misses and he needs to turn in to "roll in" onto the bombers tail for a follow up IR shot as had been discussed previously in this chapter(Fig 1.9). For a pure pursuit attack the Lead will turn out for more displacement to allow a high speed "rollout" onto the "6" of the bomber for a initial close IR missle attack, as was also discussed previously (Fig 1.8). If the fighter is reduced to cannons only, an off angle frontal aspect guns attack may be chosen from close range instead of a followup rear aspect attack. This can be for several reasons.
1) If the bandit is a highspeed penetrator then gaining a proper guns solution from the rear may be to difficult due to the bandits speed.
2) If the bomber is armed with a radar controlled rear turret a close in guns attack from that aspect could be hazardous to say the least.
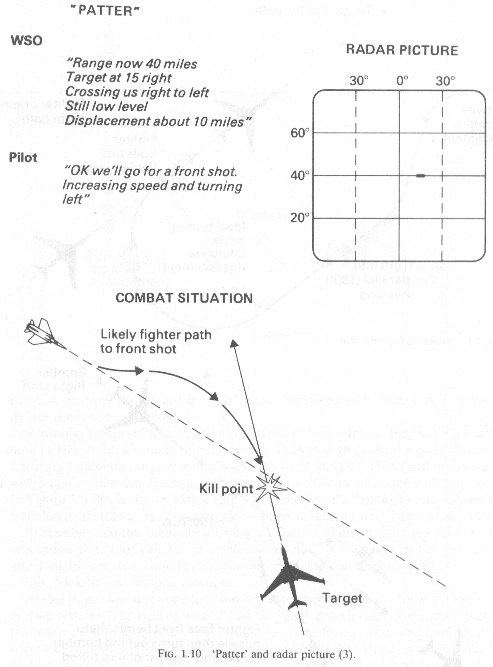
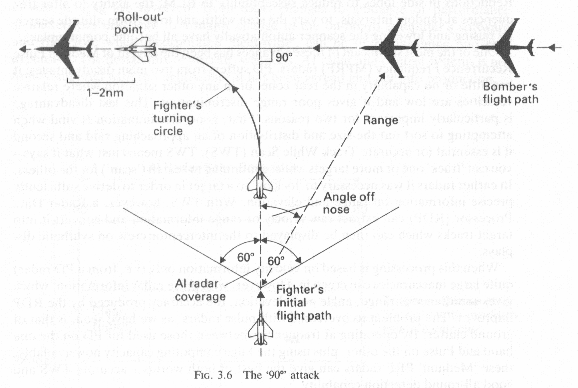
Thus a highspeed slicing frontal attack is chosen(Fig 1.10). Though difficult, this attack allows the Intercepting gun fighter to break right after the gun pass into a 90 degree attack position if his frontal shot has failed. This followup tactic is the most simple of all. The 90 degree attack is a time honored intercept tactic for gun/IR missle armed fighters. This entails a very simple high speed recovery approach back to the target at a 90 degree angle to the bandits flight path(Fig 3.6).
Although this form of attack can be hazardous as previously stated, the Defending Fighter will have no choice but to use it. Once past the bandit after the frontal shot the Defending Fighter then simple turns onto the bombers tail position at the best turning radius and speed to allow the fighter to quickly gain position of the bandit(especially important if the bandit has a high speed profile) and at the same time to enable the fighter to gain advantage, take the shot, and evade before the target can defend itself(either via radar tail turret cannons or a high speed break into the Defending Fighter).
Thus the bandit is downed and the Defensive Intercept has been accomplished with the best use of available IADS and Fighter asssets. This is the proper functioning of the "Keep It Simple Stupid"(KISS)Principle, which is paramount for all Interception Tactics. Keep this in mind at all times and you to will be as successful as this Example of the combination of IADS & Interceptor Aircraft. |
|
|
|